


How do you throw grenades and fire rockets?
Hold fire and press move, B+A, and the squad leader throws a grenade or fires a rocket toward the cursor. Which of the two you get depends on the icon selected in the status panel. Press Start, move the cursor onto the grenade or the bazooka and pick it with A.
The same combo is easy to hit by accident. If you're already holding fire when you order a move, the leader throws instead of running, so give the move order first and hold fire after it. Your machine guns can't hurt your own men. Grenades and rockets hurt anyone near the blast.
The two weapons do different jobs. A grenade sails over walls and trees but only reaches about as far as your machine guns: it lands at roughly two-thirds of that distance and rolls the rest of the way. A rocket crosses the whole screen and needs a clear line to the target. Lob grenades at anything behind cover, and fire rockets at whatever you can see from far off.
On the early maps every grenade comes from supply crates, and rockets come in packs that look like little batteries. Walk over a crate to collect it. If you shoot it, it explodes and damages everything around it, and the ammo goes with it. In Blast It's Cold, the third mission, you need every crate outside the first hut to finish the map; the only one worth shooting is a crate sitting right by a hut you want gone. From Mission 4, Phase 2 each phase starts with grenades already in hand, and from Mission 5, Phase 3 with rockets as well. Leftovers vanish when the phase ends. Inside a phase, though, every grenade may be needed for a building.
When does a hut count as destroyed?
When its door comes off. A hut can lose its whole roof and still count as standing, and until the door goes it keeps letting soldiers out. Machine-gun fire does nothing to buildings; it takes explosives.
The flying door and roof can kill your own men, so throw from a fair distance. Trash Enemy HQ (Mission 2, Phase 2) has the first hut you have to blow up: its door flies south-west and the roof can land anywhere, which makes north of the hut the safe spot. Native-style huts lose just the door. In Village People (Mission 4, Phase 3) and Trigger Happy (Mission 6, Phase 2), the native hut that has one is the enemy building, and the doorless huts beside it can stay.
Some buildings ignore grenades. A door with metal plating gives way only to shells or heat-seeking missiles, so on those maps look for a tank or a big gun before you spend anything. A factory door never flies off at all: hit it a couple of times and the phase is over, which means the factory has to be the last thing you destroy. The enemy computer is the brown glowing sphere with wires sticking out, and it takes several hits too.
Count your explosives against the buildings still standing. If you run out and there's no crate left to find, the phase can't be won, and the white flag in the status panel restarts it.
Splitting the squad
You can't give orders to one soldier. The whole squad moves and shoots together, with the leader in front and the rest following in single file. To send fewer men somewhere, you have to split them off into a squad of their own.
Press Start, select the names of the soldiers you want to split off, then select the squad logo. Your first squad is the snake, a second one gets the eagle and a third the panther, and three is the limit. The grenade and bazooka icons decide how the explosives are shared: toggle the outline around each one. A solid outline sends all of them with the new squad, a dotted one sends half, and no outline sends none. Select a logo to switch squads, and walk one squad into another to merge them again.
From Mission 5 on, this is how the hard phases get done. Make a squad of one, hand him the explosives and send him ahead against the bazooka snipers and big guns while the others stay back. One man is a smaller target, and if he dies, the rest are still alive. Scout the same way before the whole squad walks into a part of the map you haven't seen.
A squad left on its own can burn its grenades and rockets on soldiers who wander near it, so split the explosives with that in mind. Heat-seeking missiles you pick up stay with one squad after a split. On Kill All Enemy maps with holes in the ground, park a squad next to each hole and let it shoot whatever climbs out. And in Look Out, the only phase of Mission 19, you have to split into three anyway: a squad on each of the three switches brings in the chopper.
Snipers, big guns and enemy choppers
Bazooka snipers first show up in The Valley of Ice, the opening phase of Mission 5: four of them, past the last two huts. After that you meet them often. A sniper stays in one spot and waits for you to walk into range, which is exactly the job for a squad of one. Lob a grenade at him from behind a wall or a tree, or counter-snipe with a rocket.
Before you spend a rocket, wait a few seconds. Enemy rockets and shells take out their own side surprisingly often. In Have a Nice Trip (Mission 8, Phase 1), stand still at the start and the nearby sniper kills himself with his own shot. In If It Moves Kill It (Mission 10, Phase 4), move the squad to the little green bush behind the building, and the tank charges and blows itself up. The first big gun in Take Your Partners (Mission 18, Phase 1) destroys itself when it fires at you.
Big guns are turrets that fire rockets or shells. Take them out with rockets, one at a time, before you advance. From Much Much Moor in Mission 13, some of them ignore grenades and rockets, and the answer is a big gun of your own: an empty turret on the map you can climb into. Shells and heat-seeking missiles break any big gun.
Choppers are worse. The armed ones drop bombs or fire missiles, and while they fly, your grenades and machine guns can't touch them. On the ground any explosion finishes them, so wait for one to land and then strike. In Gawd Help Me (Mission 23, Phase 3), two enemy choppers sit on the ground at the start: rocket both before they take off, or restart. If an enemy chopper locks a heat-seeking missile on you, don't stop moving.
Some starts are simply lost. If a bomber gets on your tail before you reach the tank in Whopper Chopper (Mission 11, Phase 2), or the big gun right next to you in A Good Hard Tank (Mission 10, Phase 5) fires before you can give an order, press Start and restart with the white flag before anyone dies.
Vehicles and turrets
Put the cursor on a vehicle or an empty big gun and press A to climb in; the cursor turns into an arrow pointing into a box. The same button with the arrow pointing out gets everyone back on foot. B fires the vehicle's gun if it has one. Grenades and rockets can't be used from inside, and a blinking red light on top of any vehicle means the enemy is in it.
When a vehicle is destroyed, everyone inside dies with it, so a risky drive is a job for one soldier while the others wait. Land vehicles also sink. If a jump ends in the water, get out before it goes under and the crew survives. Jeep Jump, the last phase of Mission 8, asks for exactly that: you drive off a cliff into the water and bail out as the jeep sinks.
The jeep is fast, keeps bullets off your men, and some carry a machine gun on the front. The skidoo does the same job on ice and snow. Both run enemy soldiers over and jump ramps. Hold A longer to pick up speed, back up as far as you can before a ramp, and keep to its middle.
The tank is slow, and most weapons do nothing to it: hurting one takes rockets, heat-seeking missiles or shells. Its own fire knocks buildings down. Big guns don't move, and the central one in Chill Out Iceman, the last phase of Mission 12, doesn't let you out once you're in, so leave a soldier or two outside. Still, some enemy buildings can only be destroyed by a turret, so an empty one on the map is worth a look.
Choppers fly over everything. Yours may be an unarmed transport or an armed one, and nobody gets out until it lands, so pick a quiet landing spot. In A Watery Grave (Mission 24, Phase 3) you can clear a minefield by flying over it. Just don't shoot a mine next to a chopper you need: the blast takes the chopper too.
How does saving work?
With a passcode. The menu between missions has two options: Save shows the code for your current mission, and Load takes a code you type in. Start starts the next mission. If you play online a mission or two at a time, copy the code from the Save screen before you close the tab.
The code stores your losses as well as the mission, so yours will differ from the list below whenever your casualties do. The list carries someone else's dead too: the Mission 6 code brings you back without Jools. Mission 24 isn't listed, so when you get there, write down the code the Save screen gives you.
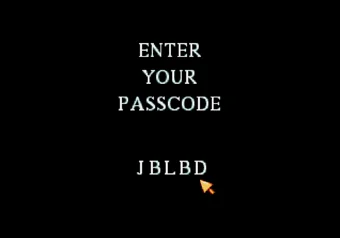
Passcodes for missions 1 to 23
- Mission 1, The Sensible Initiation: PXJND
- Mission 2, Onward Virgin Soldiers: UZHNC
- Mission 3, Antarctic Adventure: JHHJI
- Mission 4, Super Smashing Namtastic: OFLJA
- Mission 5, Those Vicious Vikings: DNKFG
- Mission 6, Westward Ho: EZMBE
- Mission 7, Greenland Redblood: JBLBD
- Mission 8, Guerrilla Warfare: OBSRH
- Mission 9, Great Scott Good Shot: TTEFD
- Mission 10, One Gigantic Dust Bowl: UTEFD
- Mission 11, Jungle More Jungle: FRLYA
- Mission 12, Chiller Thriller Killer: EOBJF
- Mission 13, More Moors: RYJBE
- Mission 14, Bomb Alley: GMEGF
- Mission 15, Get Orf Moi Laand: FFQRI
- Mission 16, Going Underground: ICXPA
- Mission 17, The Moor the Merrier: PXJVI
- Mission 18, Underpants Electric: IRORH
- Mission 19, Diablo Downstairs: TEOUA
- Mission 20, Moors the Pity: CLBGE
- Mission 21, Explore My Hole: JMNQG
- Mission 22, Desert Disaster: OOLQF
- Mission 23, Moors et Mortem: NPXFC